
Secure boot and remote updates are becoming a mandatory requirement in the market of IoT connected and secured embedded systems.
wolfSSL offers multiple solutions to update your remote embedded systems connected to the Internet. The core component that authenticates the firmware and regulates the installation of a new version is wolfBoot, the secure bootloader for all 32-bit microcontrollers.
wolfBoot follows the IETF SUIT group recommendations to validate the authenticity and the integrity of any firmware, before allowing it to run on the target. To do so, wolfBoot uses public key based authentication mechanisms provided by wolfCrypt.
In this short tutorial, we have developed a TLS 1.3 web server that can receive authenticated updates and interact with the bootloader to begin the installation once the received firmware is successfully verified and authenticated. wolfBoot will only allow genuine firmware images, generated by the device’s owner, to be installed and run on the target. The updates are signed with the owner’s private key, and can be deployed on the target from a web interface (or using a curl one-liner!).
What are the Key Differences Between wolfBoot and the Others?
wolfBoot is independent of any silicon vendor, IP designer or system vendor’s approach to the problem of secure boot and secure firmware updates. As such we support heterogeneity in keystores, like TPM 2.0, PKCS#11, STSafe, CAAM, ATECC608A, ST33, etc. In terms of hardware encryption, we support a wide variety of hardware encryption drivers such that your firmware update and re-boot will be performant. Unlike our gaggle of competitors, we also support multiple traditional, RTOS, and bare metal environments. Our heterogeneity also extends to a variety of transport mechanisms, including, SSH, cURL, TLS 1.3, HTTPS, all with a variety of TCP/IP options. Need certifications like FIPS 140-2, DO-178, MISRA or ASPICE? No problem, we do that too!
In short, we can support you in your real world application! If you have questions, then please contact us at facts@wolfssl.com.
The Base System
Our system of choice for this example is the NXP Kinetis K64 freedom board. The hardware manufacturer provides drivers and board support software, which is compiled within the running application or OS. The simplest application does not contain any operating system, and executes all the tasks in a single-threaded main loop. This approach is often referred to as ‘bare metal’, and is simple enough to implement for most embedded systems that are dedicated to a single specific task, or where the entire functionality of the device can be easily developed within a single, global state machine.
A different approach consists in integrating a real-time operating system (RTOS). FreeRTOS is one of the most popular choices for multitasking embedded systems. Our base system in this scenario runs FreeRTOS, and uses a TCP/IP stack to provide network access to its threads. FreeRTOS supports several TCP/IP stacks. We decided to use picoTCP in this case, but any embedded TCP/IP implementation would work as well.
Securing the Connections
By default, all the socket connectivity in our system will not be encrypted or secured in any way. Luckily, wolfSSL is a SSL/TLS implementation that is capable of running in small, microcontroller based systems and providing the latest and greatest security mechanisms that are recommended by international standards. wolfSSL is designed to easily be integrated with any combination of RTOS and TCP/IP stacks out there, and it provides secure socket communication using the same level of security as the rest of the IT infrastructure while being generally smaller in size and faster than all its competitors. All threads in the system are able to create secure sockets to communicate with the remote endpoint. In this case we create a simple embedded HTTPS server, only allowing TLS 1.3 connections, which is running in a thread on the target. The only purpose of our demo server is to accept a transfer request, via a HTTP POST, to upload a new version of the running firmware.
The picture below shows the architectural components of the running application.
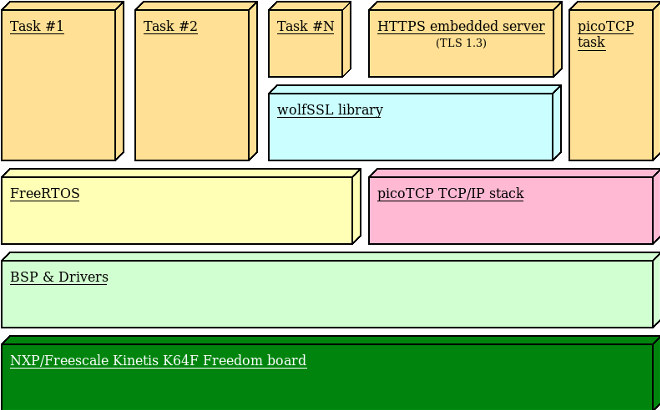
Figure 1: Architecture of secure IoT multithreading system
Secure Bootloader
Integrating wolfBoot into an existing system is easy. First of all, we create a configuration for the target device. The configuration can be generated step-by-step by running
make config
from the wolfBoot directory. The configuration also contains the information needed by the bootloader to partition the internal flash in order to accommodate two firmware images at the same time in the FLASH memory. In our scenario, we opt for the following geometry:
- A 40KB partition for wolfBoot. wolfBoot itself will be about 26KB in size, but we allow some extra space in case we want to change the public key algorithm, or if we decide to enable debugging symbols in wolfBoot to check what it is doing at boot. Adding debugging symbols will result in a larger wolfBoot image.
- Two partitions of the same size (499712 bytes). These are the partitions used to store the current firmware and the update image received through a secure connection later, which is the candidate for a new installation if the bootloader allows that.
- One single-sector (4KB) swap partition, used by wolfBoot when replacing the current firmware with an updated version, to make all the swapping operations fail-safe, and to guarantee that a copy of the old firmware is kept in the second partition after an update. This mechanism provides a reliable way to step back after a failed boot into a buggy firmware (although verified and genuine).
The setup above corresponds to the following values in wolfBoot configuration:
WOLFBOOT_PARTITION_SIZE?=0x7A000
WOLFBOOT_SECTOR_SIZE?=0x1000
WOLFBOOT_PARTITION_BOOT_ADDRESS?=0xA000
WOLFBOOT_PARTITION_UPDATE_ADDRESS?=0x84000
WOLFBOOT_PARTITION_SWAP_ADDRESS?=0xff000
Which in turn reflects the flash geometry in the figure below:
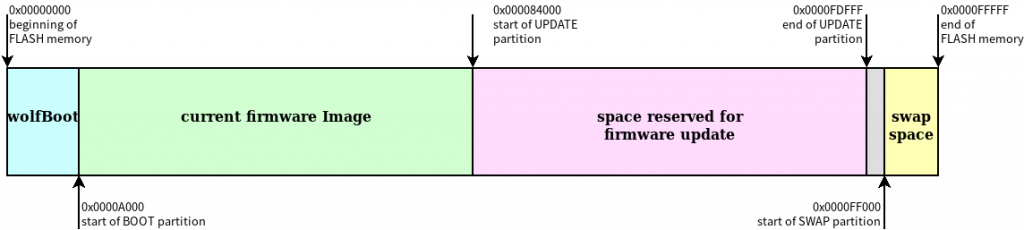
Figure 2: FLASH memory geometry chosen for this example
To sign the partition, we could use DSA or ECDSA algorithms provided by wolfCrypt. In this case, we opt for ECDSA with ECC256. A manifest header is attached at the beginning of each image: it contains the signature, the version number and other important information about the original firmware. Because of the manifest header, the actual entry point of the application has a fixed offset from the start of the BOOT partition. When using ECC256, this offset is 256 Bytes, so the actual starting point for the application code will be at address 0x0A100.
Because the code of the application is not position-independent, the linker script (.ld) must be adjusted so all the symbols addresses are relative to its new entry point. The MEMORY section in our original linker script contained the following line:
FLASH (rx) : ORIGIN = 0x00000000, LENGTH = 1M
Which we replace with:
FLASH (rx) : ORIGIN = 0x0000A100, LENGTH = 0x7A000
In order to accommodate the bootloader at the beginning of the FLASH.
Sign and Install the Initial Firmware
In the example code provided, all the operations to create the initial image are automated, and executed by simply running make. However, all the steps are explained here to understand what is going on under the hood.
When the bootloader is compiled for the first time, the key pair is generated. The public key can be safely included in the wolfboot image (wolfboot.bin), while the corresponding private key (ecc256.der in our case) must be safely stored and never distributed. The private key is very important, as it is used to sign the firmware image that we are about to upload to the target, and all the future updates that we shall want to upload in the future via the device HTTPS interface, simply using our web browser. When the application is compiled and linked via our modified linker script, we sign it and assign a version number. This is accomplished using the python script sign.py, included in wolfBoot:
sign.py --ecc256 image.bin ../wolfBoot/ecc256.der 1
which will create a new image image_v1_signed.bin containing the manifest header for the verification required to run on the target.
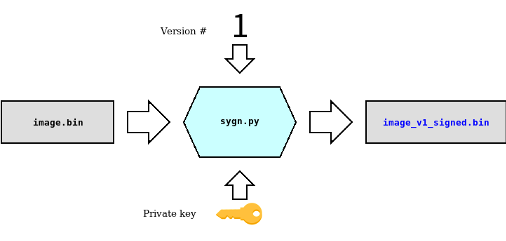
The two images wolfboot.bin and image_v1_signed.bin are then combined into the final image factory.bin, taking into account the partitions offset. If the image has been created correctly and uploaded to the device, the system will boot into wolfboot, which takes a few milliseconds to validate the image.
HTTPS-based Firmware Updates
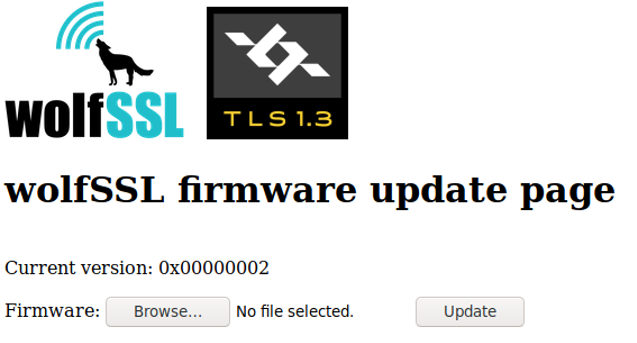
One FreeRTOS thread is responsible for responding to HTTPS requests. In the example code, the system responds on the Ethernet interface to IP address 192.168.178.211 on port 443. A web browser that supports TLS 1.3 can access the web interface at that address. The example code that manages the HTTPS requests from the client is very simple: it responds to GET requests with a form page, where a new signed firmware update can be uploaded, and to POST request by storing the firmware in the UPDATE partition and initiate the shutdown.
When we create a new version of the software, we can simply sign the new image using the sign.py script, and increase the version number in the command invocation:
sign.py --ecc256 image.bin ../wolfBoot/ecc256.der 2
The new application image can be simply uploaded from a web browser the embedded HTTPS on the board.

When the transfer is complete, the device informs the bootloader that an update is available, and reboots to complete the installation of the new version. The page should reload automatically after about 30 seconds, to show that the updated firmware has been authenticated and it is now running.
Source Code
The source code for this demo is available at:
https://github.com/wolfSSL/wolfBoot-examples/tree/master/freeRTOS-Freescale-K64F-https-TLS1.3
The system analyzed in this tutorial represents an example of just one of the many possibilities of integration of wolfSSL solutions for securing the boot process of embedded micro controllers. Different products (wolfMQTT, wolfSSH) may be combined with the secure boot mechanism provided with wolfBoot to secure the entire firmware update process.
If you have any questions or run into any issues, contact us at facts@wolfssl.com, or call us at +1 425 245 8247.